Playing Easy Chords: Part 2
Preface (skip if this isn’t your first time here):
THERE ARE TOO MANY PEOPLE WHO DON’T KNOW ANYTHING USEFUL ABOUT THE GUITAR!
It’s because no one either showed them anything useful or they never found out the basics of playing guitar.
DON’T BE LIKE THEM!
Here we are going to talk about those guitar basics in bite-sized chunks.
Hopefully, this will give you everything necessary to understand how to play the instrument, fix any flaws in your playing, and form ideas on how to change things up in your technique.
We’re moving on up from simply being able to read chords to playing every single easy chord out there.
It’s time for the two and three finger easy chords. These will be tough so make sure you can play the solo finger easy chords first.
Also brush up on how to read Chord Charts, Left Hand Technique, and your Finger Names, then check out the complete chord chart below.

For all of these chords you’re going to need to pay close attention to your left hand. Remember these things:
Play with your fingertips
Keep your hand in the claw-like position with your thumb in-line with your index or middle finger
Keep your hand perpendicular to the guitar neck with your finger nails facing the ceiling, not your face.
Keep your wrist relaxed. Don’t let your hand get into a waiter-like position with the wrist bent backwards.
Two finger chord time! Let’s start with Am, E, and A.

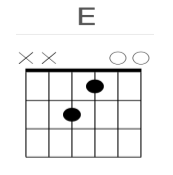
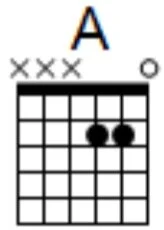
Notice these chords are basically the same (just one string off). Use the 1st finger on the 1st fret and 2nd finger on the 2nd fret.
And just like the solo finger chords, you need to make sure you can hear all the strings of the chords (ESPECIALLY THE 1ST STRING!).
Again, to make sure that you’re hearing every string of every chord. To do this:
Pluck the individual strings of the chords.
Make sure all the strings can be clearly heard and nothing is muted, then strum straight down. Do not strum at an angle. If you strum at an angle, you will more than likely miss the 1st string or make the 1st string sound different than all the other strings. It’s quite sensitive.
Try out all this process on every single chord. Then strum straight down (remember to listen for the 1st string) four times for each chord. If you can do all this, it’s song time.
Strum each chord four times without pausing between chords. For Em, strum eight times (4x2=8).

If you can do that, it’s time for the big 3. Yes, using three fingers for the final easy chords.
AND HERE THEY ARE:

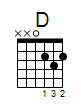


Be careful with these little puppies. Pay attention to the proper pressure with each finger. Make sure you can hear each string via our method described above. If you can make all these chords sound good, then it’s time for the finale of our easy chord journey.
The Animals: House of the Rising Sun
Strum each chord 6 times. Count your strums in two groups of three (Think 1-2-3; 1-2-3). Accent your first strum in each set of three (Bold is Louder/Accented: 1-2-3; 1-2-3).

Remember how important it is practice switching chords with chord combos. Some chord combos will be easier than others. Some important things to remember are to:
Keep your fingers close to the frets at all times.
Relax your thumb when you switch between chords.
Remember your left hand technique that we discussed earlier.
That takes care of our easy chords. Now you are an easy chord master.
Go forth and find any song that you want. Type in the name of it followed by the word “chords.” Check out what comes up and use all the easy chords on your chord chart to help you play.